使用vfio-mdev
 1
 2
 3
 4
 5
 6
 7
 8
 9
10
11
12
13
14
15
16
17
18
19
20
21
22
23
24
25
26
27
28
|
# 加载驱动
modprobe vfio_pci

# 编译内核模块
cd /home/cjs/usr/src/linux-5.10.0-60.18.0.50.r1064_55.hce2.x86_64/
make modules

# 编译mdev模块
make M=/home/cjs/usr/src/linux-5.10.0-60.18.0.50.r1064_55.hce2.x86_64/drivers/vfio/ -C /home/cjs/usr/src/linux-5.10.0-60.18.0.50.r1064_55.hce2.x86_64 -j10 CONFIG_VFIO_MDEV=m

# 安装mdev模块
insmod mdev.ko
insmod vfio_mdev.ko

# 编译mdev示例设备mtty
make M=/home/cjs/usr/src/linux-5.10.0-60.18.0.50.r1064_55.hce2.x86_64/samples/vfio-mdev/ -C /home/cjs/usr/src/linux-5.10.0-60.18.0.50.r1064_55.hce2.x86_64 -j10 CONFIG_SAMPLE_VFIO_MDEV_MTTY=m

# 安装mtty模块
insmod mtty.ko

# 创建一个mtty mdev设备
echo "83b8f4f2-509f-382f-3c1e-e6bfe0fa1001" > /sys/devices/virtual/mtty/mtty/mdev_supported_types/mtty-2/create

# 使用该mdev设备拉起虚拟机
qemu-kvm -machine q35,accel=kvm -cpu host -smp 8 -m 16G -drive if=none,id=root,file=./centos7.2_cn.qcow2_par -device virtio-blk-pci,drive=root,disable-legacy=on -vga std -vnc :66 -device vfio-pci,addr=05.0,sysfsdev=/sys/bus/mdev/devices/83b8f4f2-509f-382f-3c1e-e6bfe0fa1001 -daemonize

# 删除mtty mdev设备
echo 1 > /sys/bus/mdev/devices/83b8f4f2-509f-382f-3c1e-e6bfe0fa1001/remove
|
echo “83b8f4f2-509f-382f-3c1e-e6bfe0fa1001” >/sys/devices/virtual/mtty/mtty/mdev_supported_types/mtty-2/create
执行的是mdev_device_create
echo 1 > /sys/bus/mdev/devices/83b8f4f2-509f-382f-3c1e-e6bfe0fa1001/remove
执行的是mdev_device_remove
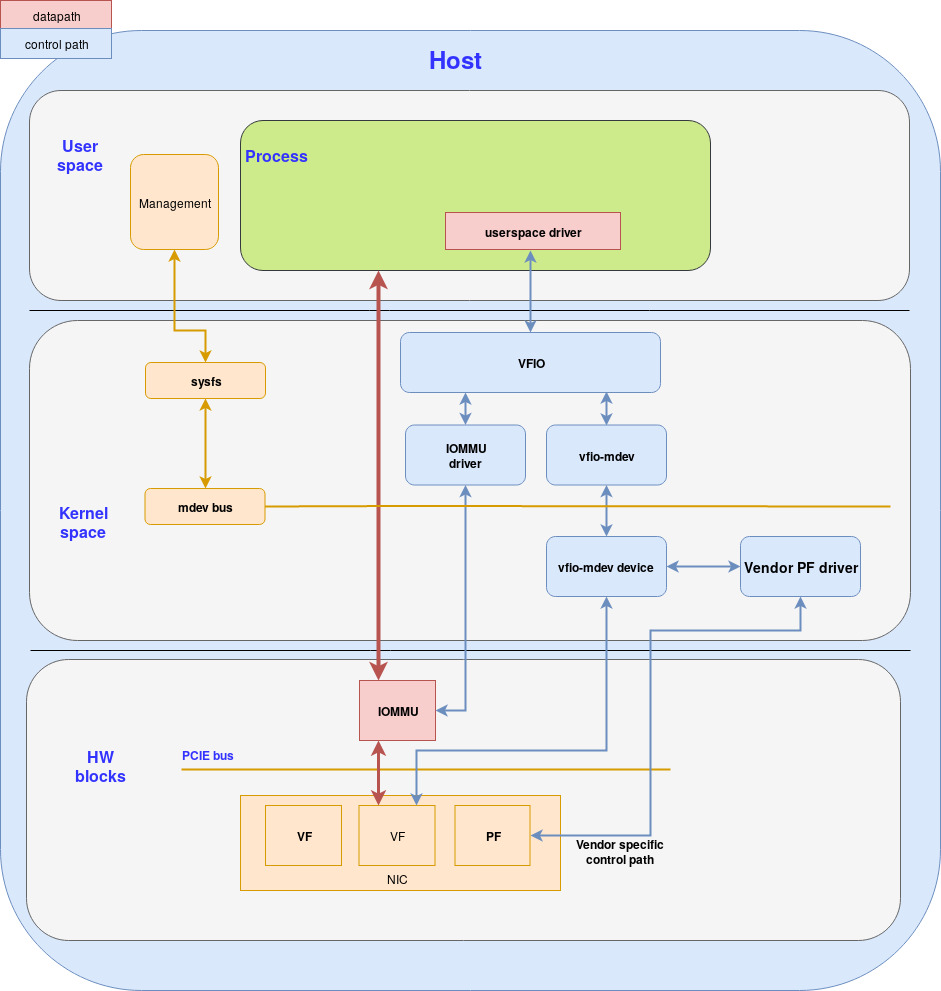
1、vfio-mdev介绍
linux官方文档:vfio-mediated-device.rst
vfio-mdev
全称:Virtual Function I/O (VFIO) Mediated devices
出现的背景:NVIDIA提出的,很多设备有DMA能力,但是不支持SR_IOV,无法虚拟化出VF分割使用,但是又存在一个设备诸如GPU需要具备这种能力,需要将后端的硬件设备拆分成更小的实例给更多的vm使用。
基于VFIO直通设备,可以在用户态通过IOMMU直通到物理设备
 +---------------+
 |               |
 | +-----------+ |  mdev_register_driver() +--------------+
 | |           | +<------------------------+              |
 | |  mdev     | |                         |              |
 | |  bus      | +------------------------>+ vfio_mdev.ko |<-> VFIO user
 | |  driver   | |     probe()/remove()    |              |    APIs
 | |           | |                         +--------------+
 | +-----------+ |
 |               |
 |  MDEV CORE    |
 |   MODULE      |
 |   mdev.ko     |
 | +-----------+ |  mdev_register_parent() +--------------+
 | |           | +<------------------------+              |
 | |           | |                         | ccw_device.ko|<-> physical
 | |           | +------------------------>+              |    device
 | |           | |        callbacks        +--------------+
 | | Physical  | |
 | |  device   | |  mdev_register_parent() +--------------+
 | | interface | |<------------------------+              |
 | |           | |                         |  i915.ko     |<-> physical
 | |           | +------------------------>+              |    device
 | |           | |        callbacks        +--------------+
 | +-----------+ |
 +---------------+
2、mdev_bus
vfio_mdev中新增了一种bus_type,mdev_bus
1
2
3
4
5
6
|
struct bus_type mdev_bus_type = {
	.name		= "mdev",
	.probe		= mdev_probe,
	.remove		= mdev_remove,
	.match		= mdev_match,
};
|
当mdev_core加载的时候,会调用bus_register(&mdev_bus_type)注册这个bus,会初始化subsys_private、klist_devices和klist_drivers这两个klist,sysfs下会创建下面目录:
1
2
3
4
5
6
|
/sys/bus/mdev/
├── devices
├── drivers
├── drivers_autoprobe
├── drivers_probe
└── uevent
|
3、设备驱动支持vfio
针对vfio模块,又定义了专门的驱动mdev_driver支持vfio
mdev设备驱动定义
 1
 2
 3
 4
 5
 6
 7
 8
 9
10
11
12
|
struct mdev_driver {
	const char *device_api;
	unsigned int max_instances;
	// 新设备注册
	int (*probe)(struct mdev_device *dev);
	// 删除设备
	void (*remove)(struct mdev_device *dev);
	// 获取最大可创建的实例数
	unsigned int (*get_available)(struct mdev_type *mtype);
	ssize_t (*show_description)(struct mdev_type *mtype, char *buf);
	struct device_driver driver;
};
|
针对于mtty示例mdev设备来说,定义如下:
 1
 2
 3
 4
 5
 6
 7
 8
 9
10
11
12
|
static struct mdev_driver mtty_driver = {
	.device_api = VFIO_DEVICE_API_PCI_STRING,
	.driver = {
		.name = "mtty",
		.owner = THIS_MODULE,
		.mod_name = KBUILD_MODNAME,
		.dev_groups = mdev_dev_groups,
	},
	.probe = mtty_probe,
	.remove	= mtty_remove,
	.get_available = mtty_get_available,
};
|
当mtty设备初始化时,会调用mtty_dev_init->mdev_register_driver->driver_register->bus_add_driver将mtty_driver驱动和上面的mdev_bus绑定起来
在mtty_probe时,会创建vfio设备,支持vfio_device相关操作
 1
 2
 3
 4
 5
 6
 7
 8
 9
10
11
12
13
14
15
16
17
18
19
20
21
22
23
24
25
26
27
28
29
30
31
32
33
|
static const struct vfio_device_ops mtty_dev_ops = {
	.name = "vfio-mtty",
	.init = mtty_init_dev,
	.release = mtty_release_dev,
	.read = mtty_read,
	.write = mtty_write,
	.ioctl = mtty_ioctl,
	.bind_iommufd	= vfio_iommufd_emulated_bind,
	.unbind_iommufd	= vfio_iommufd_emulated_unbind,
	.attach_ioas	= vfio_iommufd_emulated_attach_ioas,
	.detach_ioas	= vfio_iommufd_emulated_detach_ioas,
};

static int mtty_probe(struct mdev_device *mdev)
{
	struct mdev_state *mdev_state;
	int ret;
	// mtty设备初始化
	mdev_state = vfio_alloc_device(mdev_state, vdev, &mdev->dev,
				       &mtty_dev_ops);
	if (IS_ERR(mdev_state))
		return PTR_ERR(mdev_state);
	// 注册一个模拟的iommu
	ret = vfio_register_emulated_iommu_dev(&mdev_state->vdev);
	if (ret)
		goto err_put_vdev;
	dev_set_drvdata(&mdev->dev, mdev_state);
	return 0;

err_put_vdev:
	vfio_put_device(&mdev_state->vdev);
	return ret;
}
|
设备初始化时会注册驱动到mdev_bus上。
 1
 2
 3
 4
 5
 6
 7
 8
 9
10
|
# 注册mdev设备驱动
int mdev_register_driver(struct mdev_driver *drv)
{
	if (!drv->device_api)
		return -EINVAL;

	/* initialize common driver fields */
	drv->driver.bus = &mdev_bus_type; // 设置驱动的bus为mdev_bus
	return driver_register(&drv->driver);
}
|
在调用bus_add_driver时,主要是初始化driver_private,并将该driver挂到mdev_bus的klist_drivers上,然后创建drivers目录下相关sysfs目录
 1
 2
 3
 4
 5
 6
 7
 8
 9
10
11
|
/sys/bus/mdev/
├── devices
├── drivers
│   └── vfio_mdev
│       ├── bind
│       ├── module -> ../../../../module/vfio_mdev
│       ├── uevent
│       └── unbind
├── drivers_autoprobe
├── drivers_probe
└── uevent
|
去注册mdev设备驱动
void mdev_unregister_driver(struct mdev_driver *drv);
4、设备适配mdev框架
mdev设备驱动需要做的事:
- config space、bar region、PCIe cap
- mmio访问
- dma
- 中断
设备除了要实现上述功能外,还需要将自身注册为虚拟设备的父设备,通过mdev_register_parent来实现。
注册父设备
int mdev_register_parent(struct mdev_parent *parent, struct device *dev,
		struct mdev_driver *mdev_driver, struct mdev_type **types,
		unsigned int nr_types);
去注册父设备
void mdev_unregister_parent(struct mdev_parent *parent);
并在sysfs下给parent创建相应的目录
/sys/devices/virtual/mtty/mtty/
├── 83b8f4f2-509f-382f-3c1e-e6bfe0fa1001
│   ├── driver -> ../../../../../bus/mdev/drivers/vfio_mdev
│   ├── iommu_group -> ../../../../../kernel/iommu_groups/0
│   ├── mdev_type -> ../mdev_supported_types/mtty-2
│   ├── power
│   │   ├── autosuspend_delay_ms
│   │   ├── control
│   │   ├── runtime_active_time
│   │   ├── runtime_status
│   │   └── runtime_suspended_time
│   ├── remove
│   ├── subsystem -> ../../../../../bus/mdev
│   ├── uevent
│   └── vendor
│       └── sample_mdev_dev
├── mdev_supported_types
│   ├── mtty-1
│   │   ├── available_instances
│   │   ├── create
│   │   ├── device_api
│   │   ├── devices
│   │   └── name
│   └── mtty-2
│       ├── available_instances
│       ├── create
│       ├── device_api
│       ├── devices
│       │   └── 83b8f4f2-509f-382f-3c1e-e6bfe0fa1001 -> ../../../83b8f4f2-509f-382f-3c1e-e6bfe0fa1001
│       └── name
├── mtty_dev
│   └── sample_mtty_dev
├── power
│   ├── autosuspend_delay_ms
│   ├── control
│   ├── runtime_active_time
│   ├── runtime_status
│   └── runtime_suspended_time
├── subsystem -> ../../../../class/mtty
└── uevent
5、如何创建可以直通给vm的mdev设备
原先SRIOV场景下需要把设备从原有驱动unbind,再bind到vfio-pci驱动上,而mdev设备则是通过sysfs在用户空间创建mdev设备
在执行echo "83b8f4f2-509f-382f-3c1e-e6bfe0fa1001" > /sys/devices/virtual/mtty/mtty/mdev_supported_types/mtty-2/create之后会执行create_store
 1
 2
 3
 4
 5
 6
 7
 8
 9
10
11
12
13
14
15
16
17
18
19
20
21
22
23
24
25
26
27
|
static ssize_t create_store(struct mdev_type *mtype,
			    struct mdev_type_attribute *attr, const char *buf,
			    size_t count)
{
	char *str;
	guid_t uuid;
	int ret;

	if ((count < UUID_STRING_LEN) || (count > UUID_STRING_LEN + 1))
		return -EINVAL;

	str = kstrndup(buf, count, GFP_KERNEL);
	if (!str)
		return -ENOMEM;
    // 解析guid
	ret = guid_parse(str, &uuid);
	kfree(str);
	if (ret)
		return ret;

	ret = mdev_device_create(mtype, &uuid);
	if (ret)
		return ret;

	return count;
}
static MDEV_TYPE_ATTR_WO(create);
|
create_store只是sysfs里面定义封装的入口,紧接着会调用真实创建设备的mdev_device_create
 1
 2
 3
 4
 5
 6
 7
 8
 9
10
11
12
13
14
15
16
17
18
19
20
21
22
23
24
25
26
27
28
29
30
31
32
33
34
35
36
37
38
39
40
41
42
43
44
45
46
47
48
49
50
51
52
53
54
55
56
57
58
59
60
61
62
63
64
65
66
67
68
69
70
71
72
73
74
75
76
77
78
79
80
81
82
83
84
85
86
87
88
89
90
|
// echo guid到create文件之后创建mdev设备
int mdev_device_create(struct mdev_type *type, const guid_t *uuid)
{
	int ret;
	struct mdev_device *mdev, *tmp;
	struct mdev_parent *parent = type->parent;
	struct mdev_driver *drv = parent->mdev_driver;

	mutex_lock(&mdev_list_lock);

	/* Check for duplicate */
	// 遍历mdev_list,检查是否已存在相同uuid的mdev
	list_for_each_entry(tmp, &mdev_list, next) {
		if (guid_equal(&tmp->uuid, uuid)) {
			mutex_unlock(&mdev_list_lock);
			return -EEXIST;
		}
	}

	if (!drv->get_available) {
		/*
		 * Note: that non-atomic read and dec is fine here because
		 * all modifications are under mdev_list_lock.
		 */
		if (!atomic_read(&parent->available_instances)) {
			mutex_unlock(&mdev_list_lock);
			return -EUSERS;
		}
		// 减少可用实例数
		atomic_dec(&parent->available_instances);
	}

	mdev = kzalloc(sizeof(*mdev), GFP_KERNEL);
	if (!mdev) {
		mutex_unlock(&mdev_list_lock);
		return -ENOMEM;
	}
	// mdev设备初始化
	device_initialize(&mdev->dev);
	// 设置mdev设备父设备
	mdev->dev.parent  = parent->dev;
	// 设置mdev设备总线类型
	mdev->dev.bus = &mdev_bus_type;
	mdev->dev.release = mdev_device_release;
	// groups用来创建sysfs文件
	mdev->dev.groups = mdev_device_groups;
	mdev->type = type;
	/* Pairs with the put in mdev_device_release() */
	kobject_get(&type->kobj);
	// 设置mdev设备的uuid
	guid_copy(&mdev->uuid, uuid);
	list_add(&mdev->next, &mdev_list);
	mutex_unlock(&mdev_list_lock);

	ret = dev_set_name(&mdev->dev, "%pUl", uuid);
	if (ret)
		goto out_put_device;

	/* Check if parent unregistration has started */
	if (!down_read_trylock(&parent->unreg_sem)) {
		ret = -ENODEV;
		goto out_put_device;
	}
	// 添加mdev设备
	ret = device_add(&mdev->dev);
	if (ret)
		goto out_unlock;
	// 设备绑定到mdev驱动
	ret = device_driver_attach(&drv->driver, &mdev->dev);
	if (ret)
		goto out_del;

	ret = mdev_create_sysfs_files(mdev);
	if (ret)
		goto out_del;

	mdev->active = true;
	dev_dbg(&mdev->dev, "MDEV: created\n");
	up_read(&parent->unreg_sem);

	return 0;

out_del:
	device_del(&mdev->dev);
out_unlock:
	up_read(&parent->unreg_sem);
out_put_device:
	put_device(&mdev->dev);
	return ret;
}
|
创建后会一路调用到mdev_driver mtty_driver的probe,调用顺序:mdev_device_create->device_driver_attach->__driver_probe_device->really_probe->call_driver_probe->mdev_bus_type.probe->mtty_driver.probe
 1
 2
 3
 4
 5
 6
 7
 8
 9
10
|
// mdev probe实现比较简单,直接调用mdev_driver.probe
static int mdev_probe(struct device *dev)
{
	struct mdev_driver *drv =
		container_of(dev->driver, struct mdev_driver, driver);

	if (!drv->probe)
		return 0;
	return drv->probe(to_mdev_device(dev));
}
|
mdev注册了一个模拟的iommu group,类型为VFIO_EMULATED_IOMMU
mtty_probe->vfio_register_emulated_iommu_dev->__vfio_register_dev->vfio_device_set_group->vfio_noiommu_group_alloc->vfio_create_group->vfio_group_alloc->vfio_group_fops.unlocked_ioctl->vfio_group_ioctl_set_container->vfio_iommu_driver_ops_type1.vfio_iommu_type1_attach_group
由于mdev设备硬件没有IOMMU能力,所以需要软件模拟IOMMU功能,参考vfio_iommu.emulated_iommu_groups实现
 1
 2
 3
 4
 5
 6
 7
 8
 9
10
11
12
13
14
15
16
17
18
19
20
21
22
23
24
25
26
27
28
29
30
31
32
33
34
35
36
37
38
39
40
|
struct vfio_iommu {
	struct list_head	domain_list;
	struct list_head	iova_list;
	struct mutex		lock;
	struct rb_root		dma_list;
	struct list_head	device_list;
	struct mutex		device_list_lock;
	unsigned int		dma_avail;
	unsigned int		vaddr_invalid_count;
	uint64_t		pgsize_bitmap;
	uint64_t		num_non_pinned_groups;
	bool			v2;
	bool			nesting;
	bool			dirty_page_tracking;
	struct list_head	emulated_iommu_groups; //
};
// mdev设备无法做dma map
static int vfio_dma_do_map(struct vfio_iommu *iommu,
			   struct vfio_iommu_type1_dma_map *map)
{
    ……

	/* Don't pin and map if container doesn't contain IOMMU capable domain*/
	if (list_empty(&iommu->domain_list))
		dma->size = size;
	else
		ret = vfio_pin_map_dma(iommu, dma, size);
}
// mdev设备同样不支持unmap
static int vfio_dma_do_unmap(struct vfio_iommu *iommu,
			     struct vfio_iommu_type1_dma_unmap *unmap,
			     struct vfio_bitmap *bitmap)
{
    ……
	/* Cannot update vaddr if mdev is present. */
	if (invalidate_vaddr && !list_empty(&iommu->emulated_iommu_groups)) {
		ret = -EBUSY;
		goto unlock;
	}
}
|
聊聊vfio mdev工作原理 · kernelnote
VFIO Part II. VFIO-mdev | tcbbd的博客
https://www.redhat.com/en/blog/how-deep-does-vdpa-rabbit-hole-go
Written with StackEdit.